[Back to Home Page]

www.RomanBlack.com

Bit bang serial with just 2 resistors
Connecting a PIC to PC serial port with the minimal hardware - orig 19th July 2009 - updated 21 Nov 2009.


The serial hardware


Because the bit banged serial can be generated as inverted you dont need any hard ware to connect to a PC serial port apart from 2 resistors, a 3-wire cable, and a standard DE9 (female) serial plug.

Although this is NOT in perfect compliance with RS232 spec it is quite safe as the resistors keep the currents well within the safe operating specs. It works perfectly on 99.9% of all PC serial ports and almost all RS232 serial ports.


How does it work?

This simple system relies on 3 things;
1. The serial chip in the PC works fine receiving logic level data from the PIC (ie 0v to 5v), the vast majority of PCs will work
2. The 22k resistor lets the PIC accept +10v to -10v RS232 signal levels by clamping with its internal pin diodes to 0v and 5v, at 0.5mA
3. The PIC software manually generates/receives the serial data INVERTED, this matches the inverted RS232 levels the PC needs. You can't do this with a PIC USART, only manually like my bit banged code.


Sending serial data to the PC

Hyperterminal is supplied with Windows up to XP, I'm not sure if Vista includes it. Open Start->Programs->Accessories->Communications->Hyperterminal and OPEN a new hyperterminal (I just called mine "test_serial_in") and set it to "Direct to Com 1" or (whatever your serial port is) then press "configure" and you just have to change the serial baudrate to 19200.

Then press "ok" and you should be ready to start receiving ascii text from the PC serial port. You should also "file->save" your new terminal setup.

There also many freeware PC serial terminal programs.


Code to send serial to the PC


Below is the code for a simple function to send a byte to the PC port, the byte is sent inverted so you can use the 2 resistor connector shown above.

The clever part about the code below is that it keeps the period error for each bit retained in TMR1, so that it always corrects on the next bit. This means that a single constant can be used to set the baudrate; the constant is #defined as SER_BAUD and it is simply the number of TMR1 ticks needed to generate 1 bit. With the self correcting system it means that even though a single bit may have a +/- small period error the average bitrate will be exact, and set by SER_BAUD.


// a bit banged serial function, sends INVERTED serial data
// to PC serial port using just 2 resistors.

#define PIN_SER_OUT LATA.F3       // which pin for serial out (PORTA.F3)
#define SER_BAUD 51               // TMR1 (1Mhz/19200 baud) = 52
                                  // tested; works from 49 to 53, using 51

//---------------------------------------------------------
void send_serial_byte(unsigned char data)
{
  // this manually sends a serial byte out any PIC pin.
  // NOTE! serial is inverted to connect direct to PC serial port.
  // baud timing is done by using TMR1L and removing
  // timer error after each baud.
  unsigned char i;

  i=8;                            // 8 data bits to send

  PIN_SER_OUT = 1;                // make start bit
  TMR1L = (256 - SER_BAUD);       // load TMR1 value for first baud;
  while(TMR1L.F7);                // wait for baud

  while(i)                        // send 8 serial bits, LSB first
  {
    if(data.F0) PIN_SER_OUT = 0;  // invert and send data bit
    else    PIN_SER_OUT = 1;

    data = (data >> 1);           // rotate right to get next bit
    i--;
    TMR1L -= SER_BAUD;            // load corrected baud value
    while(TMR1L.F7);              // wait for baud
  }

  PIN_SER_OUT = 0;                // make stop bit
  TMR1L -= SER_BAUD;              // wait a couple of baud for safety
  while(TMR3L.F7);
  TMR1L -= SER_BAUD;
  while(TMR1L.F7);
}
//---------------------------------------------------------


Code to receive serial from the PC

This also works fine with the simple 2-resistor connector shown above.

However receiving serial has the same problem as all bit banged serial receive systems. The PIC must sit in a tight loop waiting for serial to be received. This is still a perfectly workable system where you have a PIC that is not doing much, or need serial on a PIC with no USART etc.

One way of getting around this is for the PC to send a number of "preamble" bytes first, when the PIC notices these it can stop its other tasks and then wait for the "proper" serial data that will come at the end after the preamble bytes. Or the PIC can be synchronised so it does its other tasks AFTER the serial data is received, which will work fine provided the PC waits for a suitable small delay before it sends the next lot of serial data.

Note! It uses the same baud error correcting system as the code above, where the error from each bit is retained in TMR1 to be corrected in the next bit. Note too that the START bit needs to be a period of 1.5 baud, so that sampling after that is done in the MIDDLE of each bit period.


// this function receives a single serial byte from the PC
// the function main must first detect the start bit, then
// call receive_serial_byte()

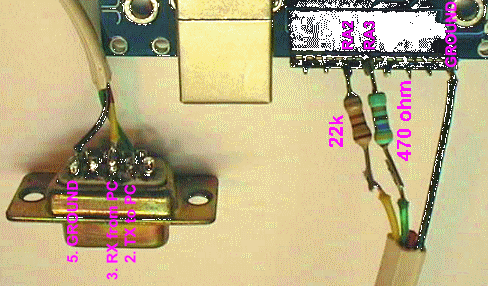
#define PIN_SER_IN PORTA.F2     // which pin for serial input (PORTA.F2)
#define SER_BAUD 51             // TMR1 (1Mhz/19200 baud) = 52
unsigned char rdata;            // holds the serial byte that was received

//---------------------------------------------------------
void receive_serial_byte(void)
{
  // this manually receives a serial byte in any PIC pin.
  // NOTE! serial is inverted to connect direct to PC serial port.
  // baud timing is done by using TMR1L and removing
  // timer error after each baud. Starts with 1.5 baud delay,
  // so each bit is sampled in middle of baud.
  unsigned char i;

  i=8;                            // 8 data bits to receive

  TMR1L = (256 - SER_BAUD - 19);  // load TMR1 value for ~1.5 baud
  while(TMR1L.F7);                // wait for baud

  while(i)                        // receive 8 serial bits, LSB first
  {
    rdata = (rdata >> 1);         // rotate right to store each bit
    if(PIN_SER_IN)  rdata.F7 = 0; // invert and save data bit
    else      rdata.F7 = 1;

    i--;
    TMR1L -= SER_BAUD;            // load corrected baud value
    while(TMR1L.F7);              // wait for baud
  }

  TMR1L -= SER_BAUD;              // wait for stop bit, ensure serial port is free
  while(TMR1L.F7);

}
//---------------------------------------------------------

//---------------------------------------------------------
void main()
{
  // main loop here; check buttons, send serial text
  while(1)
  {
    while(!PIN_SER_IN);        // wait here for serial byte start bit
    receive_serial_byte();     // then get the byte in rdata
  }
}
//---------------------------------------------------------


Sharp GP2 distance sensor, data sent to PC

This is a complete project for PIC 18F1320, it reads the analog voltage output from a Sharp GP2 infrared distance sensor, then converts that analog signal to a decimal distance reading in cm, then sends the distance reading to the PC serial port every 2 seconds.


This is an infrared DISTANCE sensor, becoming popular for hobby and pro robotics tasks to sense objects up to 80cm (31") distance. It has inbuilt electronics that detect how far away an object is, and outputs an analog voltage on 1 pin to tell the robot how far it is from a wall etc. Like all the Sharp GP2 series sensors it uses clever geometric testing of the infrared beam to detects distance regardless of the type of reflecting surface or its colour etc.

They can be bought (usually under $15) from many robot suppliers including;
www.pololu.com
www.hobbyengineering.com
www.robot-advance.com


Unfortunately the GP2 output is not linear compared to distance. It needs a conversion to turn the 0.4v - 3.2v output signal into a distance measurement of 7cm to 80cm.


The Sharp datasheet for a similar GP2 sensor (GP2D120) shows a formula for inverse number of distance (1 / L + 0.42) (where L is distance). This had linearised the graph nicely.

The formula I used is distance = (1 / volts) then that distance value still contains the linear error from the optics (the 0.42) so after some testing I found the correction factor for my sensor was 2.0. This made sense as the GP2D120 had a max range of 30cm and a correction factor of 0.42, my sensor (GP2Y0A21YK0F) has a range of 80cm and the correction factor I found from testing was 2.0 which makes sense based on ratio. Of course the "distance" result needs scaling to cm so I found the scale factor to be about 6050 (see code below).


/**********************************************************
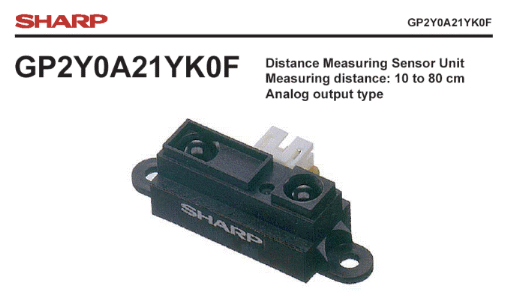
  SharpGP2_Serial.c   RomanBlack.com - orig 19th July 2009.

  PIC 18F1320, uses my "zero error 1 second timer"
  system to generate a 2 second interval, then every
  2 seconds it reads an analog voltage from a
  Sharp GP2 distance sensor and converts it to decimal
  distance, then sends that data as a text string to PC
  via bitbanged serial out. It also flashes a LED on
  PIC pin RA0.

  Code for MikroC, config handled by MikroC compiler;
  _INTI02_OSC_1H
  _WDT_OFF_2H
  -MCLRE_ON_3H
  _LVP_OFF_4L
  _PWRT_ON_2L

**********************************************************/

// functions declared
void calc_distance(void);
void send_serial_message(void);
void send_serial_byte(unsigned char);

#define PIN_LED LATA.F0         // pin for LED
#define PIN_SER_OUT LATA.F3     // pin for serial out (PORTA.F3)
#define SER_BAUD 51             // TMR3 (1Mhz/19200 baud) = 52
                                // tested; works from 49 to 53, using 51

unsigned char cm10;             // for distance display
unsigned char cm;               //

unsigned int math;              // used for voltage calculations
unsigned long bres;             // for bresenham 2-second timer system


//---------------------------------------------------------
void main()
{
  // setup the PIC 18F1320
  OSCCON = 0x72;          // internal osc, 8MHz

  PORTA = 0;
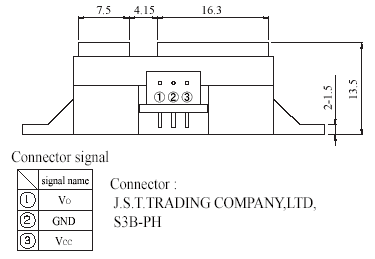
  TRISA = 0b00000010;     // RA7 high imp, RA3 is serial out,
                          // RA1 is ADC input measuring VR1
  PORTB = 0;
  INTCON2 = 0;            // PORTB pullups ON
  TRISB = 0b00000000;     // PORTB not used

  ADCON0 = 0b00000101;    // ADC ON, RA1 is ADC input
  ADCON1 = 0b01111101;    // AN1 is ADC input
  ADCON2 = 0b10100010;    // right justify, 8Tad, 32Tosc

  T1CON = 0b00010001;     // TMR1 is ON, 1:2 prescale, =1MHz
  T3CON = 0b00010001;     // TMR3 is ON, 1:2 prescale, =1MHz

  // main loop here;
  while(1)
  {
    // wait for 2 seconds, uses TMR1 free running at 1Mhz
    while(!PIR1.TMR1IF);   // wait for TMR1 overflow
    PIR1.TMR1IF = 0;       // clear overflow flag
    PIN_LED = 0;           // set LED off

    bres += 65536;         // add 65536uS to bres value
    if(bres >= 2000000)    // if reached 2 seconds!
    {
      bres -= 2000000;        // subtract 2 seconds, keep error
      PIN_LED = 1;            // flash the LED on

      // read the ADC voltage RA1 (Sharp GP2 sensor)
      ADCON0.F1 = 1;          // set GO bit, start doing ADC
      while(ADCON0.F1);       // wait until ADC done
      calc_distance();        // convert ADC value to distance
      send_serial_message();  // send message back to PC!
    }
  }
}
//---------------------------------------------------------

//---------------------------------------------------------
void calc_distance(void)
{
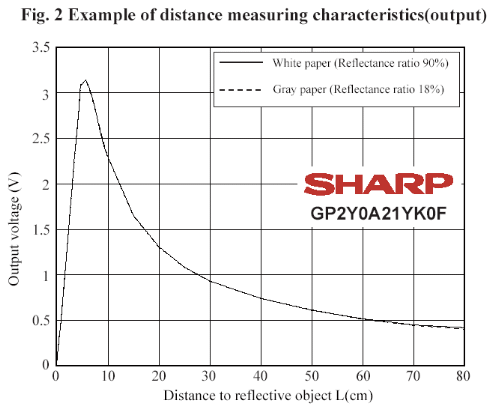
  // from the Sharp datasheet the analog voltage is
  // the inverse of distance, so distance can be calculated
  // d = (1 / volts) then just scaled to suit the sensor

  // load ADC value in 16bit math var
  math = ADRESH;
  math = (math * 256);
  math += ADRESL;

  // now invert it; (1 / volts) use (6050 / volts) for scaling
  math = (6050 / math);
  if(math >= 2) math -=2;     // fix linear error
  if(math > 99) math = 99;    // max limit at 99cm

  // convert from 0-99 to 2 decimal digits, 0-99cm
  cm10=0;
  while(math >= 10)
  {
    cm10++;
    math -= 10;
  }
  cm = math;
}
//---------------------------------------------------------

//---------------------------------------------------------
void send_serial_message(void)
{
  // send message and number to serial port
  send_serial_byte('G');          // send ascii text
  send_serial_byte('P');
  send_serial_byte('2');
  send_serial_byte('=');

  send_serial_byte('0'+ cm10);    // send number as ascii text 0-9
  send_serial_byte('0'+ cm);      // send number as ascii text 0-9
  send_serial_byte('c');
  send_serial_byte('m');

  send_serial_byte(13);           // send carriage return/linefeed pair
  send_serial_byte(10);           //  to start a new text line
}
//---------------------------------------------------------

//---------------------------------------------------------
void send_serial_byte(unsigned char data)
{
  // this manually sends a serial byte out any PIC pin.
  // NOTE! serial is inverted to connect direct to PC serial port.
  // baud timing is done by using TMR3L and removing
  // timer error after each baud.
  unsigned char i;

  i=8;                            // 8 data bits to send

  PIN_SER_OUT = 1;                // make start bit
  TMR3L = (256 - SER_BAUD);       // load TMR3 value for first baud;
  while(TMR3L.F7);                // wait for baud

  while(i)                        // send 8 serial bits, LSB first
  {
    if(data.F0) PIN_SER_OUT = 0;  // invert and send data bit
    else    PIN_SER_OUT = 1;

    data = (data >> 1);           // rotate right to get next bit
    i--;
    TMR3L -= SER_BAUD;            // load corrected baud value
    while(TMR3L.F7);              // wait for baud
  }

  PIN_SER_OUT = 0;                // make stop bit
  TMR3L -= SER_BAUD;              // wait a couple of baud for safety
  while(TMR3L.F7);
  TMR3L -= SER_BAUD;
  while(TMR3L.F7);
}
//---------------------------------------------------------


The final result was good! Accuracy was pretty good anytime I could hold my 12"x10" piece of wood steady enough next to the tape measure. The output displayed in cm was within +/-1cm accuracy from 8cm range right out to 80cm range (the datasheet min-max range is 10-80).


Here are the results shown in Windows Hyperterminal;


- end -

[Back to Home Page]